High-Quality 3D Print Online produces three-dimensional objects using a digital file and a 3D printer. This can be done through online services, where customers can upload their 3D model files and have the objects printed and delivered to them. The term “high-quality” typically refers to prints that have a high level of detail, accuracy, and finish, which can vary depending on the capabilities of the 3D printer and the materials used.
Ordering high-quality 3D prints online typically takes a few steps below:
Step 1 – Choose the type of 3D print service
There are several types of 3D print services, including:
- Online 3D printing services: These companies offer 3D printing services through their website. You can upload your 3D model, select your material and finish options, and get a quote. They then print and ship the final product to you.
- Local 3D printing services: These companies offer 3D printing services at a physical location. You can either bring your 3D model on a USB drive or upload it online and pick up the finished product.
- In-house 3D printing: A company or organization has its 3D printer and staff to operate it. They print their designs in-house.
- Desktop 3D printing: This is when individuals have their 3D printers and print their designs at home.
The type of 3D print service you choose will affect the time it takes to order a 3D print, as well as the cost and quality of the final product.
Step 2 – Size and complexity of the 3D model
The size and complexity of a 3D model can significantly impact the cost and lead time of a 3D print. In general:
- Size: Larger models will typically be more expensive to print due to the increased amount of material and time required to produce them. However, some 3D printing services may offer volume discounts for larger prints.
- Complexity: Models with intricate details, undercuts, or overhangs may require additional support structures or require more time to print, which can increase the cost of the Print.
- Material: Different materials have different properties and require other printing methods, which can affect a print’s cost and lead time. For example, printing with metal or resin materials may be more expensive than printing with plastic.
- Finish: The type of finish you choose, such as sandblasting, painting, or polishing, can also affect the cost and lead time of a print.
It is essential to consider these factors when placing an order for a 3D print, as they can impact the final cost and timeline for the project. Be sure to communicate your budget and requirements to the 3D printing service and ask for a quote before placing your order.
Step 3 – Select the suitable material
Several types of materials can be used for 3D printing, including:
- Plastics: ABS (Acrylonitrile Butadiene Styrene) and PLA (Polylactic Acid) are two of the most common plastics used in 3D printing. ABS is known for its toughness and heat resistance, while PLA is a biodegradable, plant-based plastic that is easy to print.
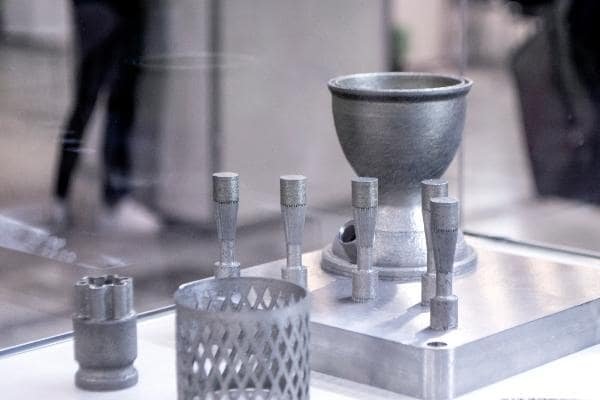
- Metals: Stainless steel, titanium, and aluminum are some of the metals that can be used for 3D printing. These materials are typically used for creating strong, durable parts with good thermal and electrical conductivity.
- Composites: Carbon fiber and glass fiber composites can be used in 3D printing to produce lightweight parts with high strength-to-weight ratios.
- Resins: Photopolymer resins are liquid plastic that hardens when exposed to UV light. They are often used for printing detailed models with high accuracy.
- Ceramics: Ceramic materials can be used for 3D printing to create solid and heat-resistant parts ideal for applications such as furnace linings and kiln components.
The choice of material will depend on the specific application and requirements of the 3D Print. Some 3D printing services may have limitations on their materials, so check with them before placing your order.
Step 4 – Select the type of 3d printing technologies
There are multiple 3D printing technologies exist., including:
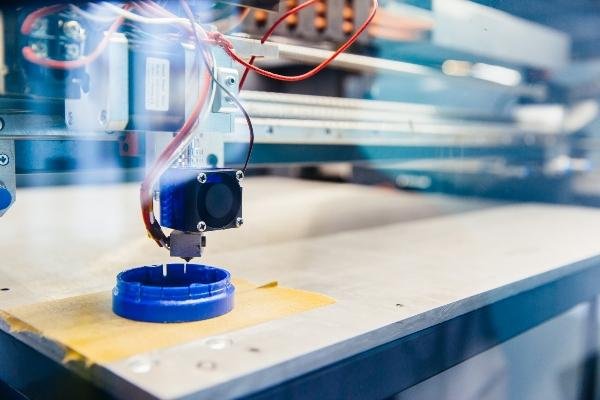
- Fused Deposition Modeling (FDM): A process where melted plastic is extruded layer by layer to create an object.
- Stereolithography (SLA): A method that solidifies liquid resin into a solid object by layer using a laser.
- Selective Laser Sintering (SLS): A process where a laser is used to fuse fine powder into a solid object.
- PolyJet: A process that uses fine jets to spray layers of material, including photopolymers, onto a build platform.
- Metal 3D Printing: A process that uses metal powders and a laser to build metal objects layer by layer.
- Direct Energy Deposition (DED): A process that uses a high-powered laser or electrode to deposit material onto a surface and build an object layer by layer.
- Binder Jetting: A binder material is used to join fine powders into a solid object.
These are some of the most commonly used 3D printing technologies. Each has advantages and disadvantages, so it’s essential to consider your specific needs and choose the best technology.
Step 5 – Choose the finishing option
3D printing finish options refer to the surface quality and appearance of a 3D printed part. Some of the standard finish options offered by 3D printing services include:
- Raw: Raw 3D prints are straight out of the printer with no additional post-processing. They may have visible layer lines and a rough surface.
- Sandblasting: Sandblasting involves blasting fine particles of abrasive material onto the surface of the 3D Print to remove layer lines and create a smoother surface finish.
- Painting: Painting involves applying color to the surface of the 3D Print to enhance its appearance and durability. This can be done with spray paint, brush-on paint, or other methods.
- Polishing: Polishing involves smoothing and shining the surface of the 3D Print to create a high-quality, reflective finish. This can be done by hand or with a machine.
- Electroplating: Electroplating involves applying a layer of metal to the surface of the 3D Print to give it a metallic appearance and improved durability.
- Dyeing: Dyeing involves coloring the entire volume of a 3D-printed part rather than just the surface. This can produce unique and eye-catching results.
The specific finish options offered by a 3D printing service may vary, so check with them for the possibilities they provide. The cost and lead time for different finish options will also vary, so be sure to factor that into your budget and project timeline.
Step 6 – Lead time for the specific 3D printing service
The lead time for a specific 3D printing service will depend on several factors, including:
- The volume of orders: If the 3D printing service is busy with a high volume of orders, the lead time for your Print may be longer.
- Size and complexity of the model: Larger and more complex models may take longer to print than smaller and simpler models.
- Material: Different materials have different printing times; some may take longer to print than others.
- Finish: Certain finishes, such as electroplating or sandblasting, may require additional post-processing time, which can increase the lead time for the Print.
- Availability of equipment: The 3D printing equipment and the technicians to operate it can also impact the lead time for the Print.
When placing your order, it is essential to communicate your project timeline to the 3D printing service, as they can provide you with a more accurate estimate of the lead time for your Print. Most 3D printing services will provide an estimated lead time on their website or when you place your order. Remember that this estimate is just that – an estimate – and the actual lead time may vary depending on the abovementioned factors.
Step 7 – Shipping time
The shipping time for a 3D print will depend on several factors, including:
- Location: The shipping time will vary depending on the distance between the 3D printing service and the shipping address.
- Shipping method: Different shipping methods have different transit times. For example, express shipping will generally be faster than standard shipping.
- Package size and weight: The size and weight of the package will impact the shipping time and cost.
- Carrier: Different carriers have different transit times, delivery schedules, and delivery options.
- Customs and duties: If the 3D Print is being shipped internationally, it may be subject to customs and duties, which can impact the shipping time.
The shipping time for a 3D print can typically range from a few days for local deliveries to several weeks for international deliveries. It is important to factor in the shipping time when planning your project timeline and to choose a shipping method that meets your needs. Many 3D printing services will provide you with a shipping estimate when you place your order, but this may not include customs and duties, so be sure to check with the carrier or customs authority for more information.
Step 8 – Upload the 3D model
To upload a 3D model to an online 3D printing service, you will typically need to follow these steps:
- Register or sign up for an account on the website of the 3D printing service you want to use.
- Prepare your 3D model in a common 3D file format such as STL, OBJ, or VRML.
- Log into your account and select the option to upload a 3D model.
- Select the 3D model file from your computer and upload it to the website.
- Review and adjust the print settings, such as material, size, and finish options.
- Confirm the order and payment information.
- Wait for the 3D printing service to process your order and print the model.
Note that the specific steps and options may vary depending on the 3D printing service you use, so be sure to consult their website for specific instructions.
Final Step – Place the order
To place an order for 3D printing, you will typically need to follow these steps:
- Choose a 3D printing service: Decide which 3D printing service you want to use, considering factors such as cost, quality, materials offered, and shipping options.
- Prepare your 3D model: Ensure your 3D model is in a compatible file format, such as STL or OBJ, and is properly scaled and oriented for printing.
- Upload your 3D model: Log into the website of the 3D printing service and upload your 3D model.
- Configure print options: Select the type of material you want to use, the finish options, and other relevant print settings.
- Get a quote: The 3D printing service will generate a quote for the Print based on the options you selected. Review the quote to ensure it meets your budget and requirements.
- Place the order: If you are satisfied with the quote, proceed to place the order by following the instructions provided by the 3D printing service. This may involve entering your billing and shipping information and making payment.
- Wait for the Print: The 3D printing service will print your model and ship it to you. The lead time for the Print will vary depending on the size and complexity of the model, as well as the material and finish options you selected.
Note that the specific steps may vary depending on the 3D printing service you use, so consult their website for detailed instructions.