Overview- A secure G Suite data backup is an excellent way to keep your data safe from being lost, hacked, or otherwise compromised. This backup helps in following IT compliance guidelines and standards.
G Suite is a Google-developed suite of web apps for corporate, personal, and enterprise use. Each G Suite user account gets 30 GB of Google Drive storage. Users can access their G Suite or Google Workspace account on the specified domain. Storage restrictions differ depending on the G Suite account type. Users can access several Google products using a G Suite account, including Drive, Calendar, DOCX, Sheets, Slides, Contacts, etc.
We cannot ensure the privacy and security of data saved on any platform. To avert a Ransomware attack or an unintentional loss, users must run backup. The guide will cover Google’s features, on-premise, and a third-party G Suite Backup solution. Let’s start here with different ways for G Suite data backup.
Google’s own features to backup G Suite Data:
Google enables several utilities for G Suite backup. These utilities are Backup & Sync, Google Takeout, and Vault.
G Suite data Backup and Sync approach:
It is necessary to backup and syncs users’ data. This approach makes something simple, and your data flow isn’t too high..
Using the Backup and Sync tool, you can synchronize your local disc with Google Drive. Your data would be duplicated twice: on Google Drive and your computer.
This approach is quick and easy to use. It is a better alternative for preserving your data on Google Drive and locally simultaneously. The space available for backup is severely restricted to your hard drive, which is insufficient for many businesses. It affects both versions if you delete or change your data with synchronization. Your backup space is limited to your hard drive, which isn’t enough for many businesses. You can use a different G suite backup approach if you desire to maintain your data for a long time.
Note-This G Suite data backup and Sync method contains some limitations in terms of security. It does not adhere backup strategy and is considered one of the backup practices. This utility does not have advanced security features for stopping Ransomware. Ransomware can infect the backup and sync process.
Google Vault G Suite Backup:
You can use the Google Vault option to archive data for audit or legal purposes.
Google Vault is an archiving tool to track data for legal purposes mainly. It’s an excellent way to keep your data safe for a long time. Google Vault has no option to restore your system files directly to Google Drive or Gmail.
This process takes a long time to export data. Then you can import it into the G Suite. It is more expensive than using third-party backup services. You must pay a massive amount if you wish to use Google Vault for G Suite data backup.
Google Takeout
Google Takeout is another G suite archiving solution. It helps to download your G Suite archive data and store it locally.
Process-
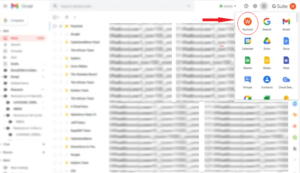
- Step1: Login to Gmail using your username and password.
- Step2:Select the Google Waffle icon from the app menu. Choose the “Account” option.
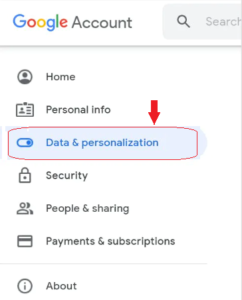
- Step3: From the navigation bar on the left-hand side of the page, select “Data & Personalization.”
- Step4:Scroll down and select “Download your data” for G Suite backup.

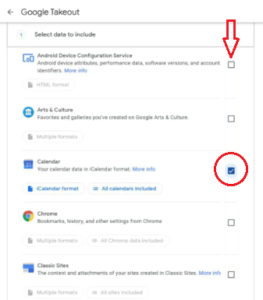
- Step5:All Google items are eligible for download by default. Select “Deselect all” from the menu.
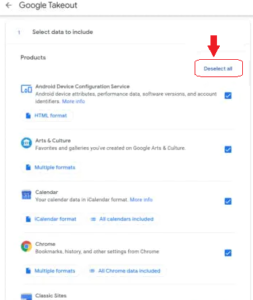
- Step6: Click the check box to select which products should be downloaded data.
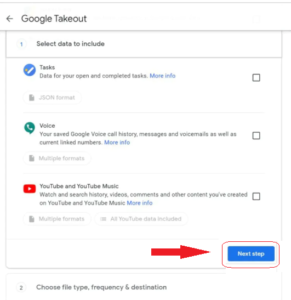
- Step 7:Click the “Next step” button after choosing the desired applications.
- Step 8: The following procedure for G Suite data backup includes:
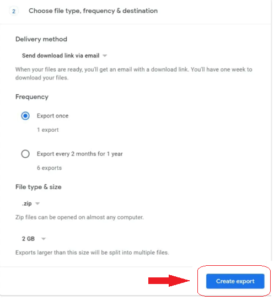
- You can select to add the downloaded files to your Drive, Dropbox, OneDrive, and Box. Or you can receive a link to the archive in your email below the “Delivery method.”
- You can select “export the files” once or twice a month in the “Frequency of export” option.
- Users can Choose (.zip or.tgz) as the file type in the “File type & size” option. Click the “Create export”.
Necessary:
The archive is downloaded as a zip file by default, with a maximum file size of 2 GB. If the size of your data archive exceeds 2 GB, it divides it into many 2 GB files as necessary. If you wish to get all of your data in one file, use the “.tgz” format, which allows you to download the archive as a single zip file up to 50 GB.
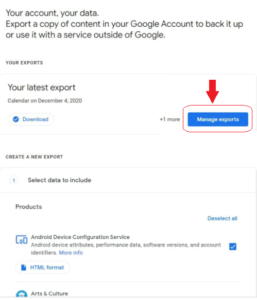
You’ll get an email message after the archive is ready for G Suite backup. The status on your takeout page can be checked by selecting the “Manage exports” option.
- Step9: Click the “Download” option next to the produced archive.
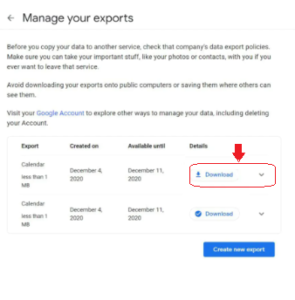
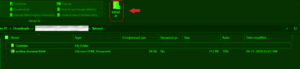
- Step10: You can extract all of the files after downloading.
This approach is sufficiently for selecting and downloading items across Google Drive, Gmail, Contact, and other G Suite programs. It comes in a variety of download formats and frequently enables customizable. You can get spreadsheets from Google Drive in PDF or XLSX file format.
You must comprehend and have most likely figured out anyway. Takeout is a utility for creating a G suite data backup, not for storing or retrieving data. Keep a copy of your data elsewhere if you use this service as a backup.
Backup for G Suite on-premise:
You can use on-premise backup if you require your backup infrastructure and have the resources to create one.
Your organization utilizes its gear and assigns someone to replicate your data. It handles its storage, accessibility, and recovery.
Without relying on an Internet connection, you may personalize your data backups with on-premise storage. You have control over where your data is kept, and copies should be made frequently.
Therefore, while keeping backups on-premise, you may run into several challenges. They are as follows:
- G Suite data Backup and recovery, as well as infrastructure maintenance, are all done manually.
- Your setup may be physically destroyed or freeze.
- Implementing on-premise infrastructure necessitates significant human and financial resources.
- This process is a risk of Data loss due to human error.
- If your data flow is heavy, you might be unable to backup.
With all of these limitations, it’s no surprise that businesses are looking for more accessible tools to set up and maintain. Despite storing data in the cloud, Google Drive is not a cloud backup that is so common. You could use specialized G suite data backup software to back your data to the local folders.
Specialized third-party G Suite Backup solution:
To automate your G Suite data safety, go with the Shoviv G suite backup and restore software. Shoviv’s tool is one of the finest G suite data backup solutions. It allows you to back up G Suite to PST format easily and securely. There is no limitation as it enables a complete backup in a single process.

This tool is a one-stop solution with features like mail filters, incremental backups, and a scheduler for G Suite data backups. It is easy to use for both individual users and administrators to backup their users’ data.
Shoviv G suite backup and restore software works with 32-bit and 64-bit versions of any Windows OS. Using this program won’t cause any technical problems. It is also the best and safe way to restore backup data to the G Suite account.
Wrapping Up:
In this article, you’ll learn how to quickly back up G Suite data to the location of your choice. The first and best thing to do is use the G Suite email account’s Google inbuilt features. But, there are inevitable side consequences to employing these approaches to exporting G Suite Apps data. We also discussed a specialized G Suite Data Backup software. That software lets you G suite backup in PST files to any location you want.
You can download the stated software free to explore how it works before a license.